
20 Rep Squat Program - Hatfield Squat Edition
20 Rep Squat Lore
If you've spent any real time in a weight room, you've probably heard about the 20 rep squat program. It goes by many names — Breathing Squats, Super Squats, The Widow Maker — but the idea is simple: load a bar with a weight you can squat for 10 reps in a row, then do 20. The gap between those two numbers is filled with willpower, deep breathing, and the kind of gut-check that can't be faked.
The program goes back to the 1930s and 40s, when a lifter named Joseph Curtis Hise started doing high-rep squats and reported huge gains in muscle and bodyweight. His results spread through the strength community and were later pushed forward by Peary Rader, the founder of Iron Man magazine, who used the method to completely transform his own body. The program got its biggest boost in 1989, when Dr. Randall Strossen published a book called Super Squats: How to Gain 30 Pounds of Muscle in 6 Weeks. The template was basic: one set of 20 rep squats, three times a week, lots of food, lots of rest.
Note: In my experience, 20 rep squats performed once a week is more than enough and I’m skeptical of claims of anybody doing it more than twice weekly. It takes a while to fully recover from this kind of intensity, and unless you want to be sore 7 days a week I would not recommend doing this program more than once or twice a week.
The results people have reported are hard to believe — until you try the program yourself. Peary Rader added over 100 pounds to his bodyweight over his lifting career, much of it tied to his high-rep squat work. Countless powerlifters and regular gym-goers have used it to bust through plateaus and pack on serious muscle in a short amount of time.
Why does it work so well? Heavy, high-rep squats create a full-body response that almost nothing else can match. Your lungs burn, your legs shake, and your whole body is forced to grow and adapt. Pair that with good eating and sleep, and the results speak for themselves.
Who Was Fred Hatfield?

Photo courtesy of wabdl.org
Dr. Fred Hatfield — known in the lifting world as "Dr. Squat" — was one of the powerlifting greats. In 1987, at age 45, he became the first person in history to squat 1,000 pounds in competition. He also wrote dozens of books on strength training and co-founded the International Sports Sciences Association (ISSA). He wasn't just incredibly strong — he understood the science behind strength, and he used that knowledge to train smarter and lift more.
The squat that carries his name is a perfect example of that smart, science-backed thinking.
What Is the Hatfield Squat?
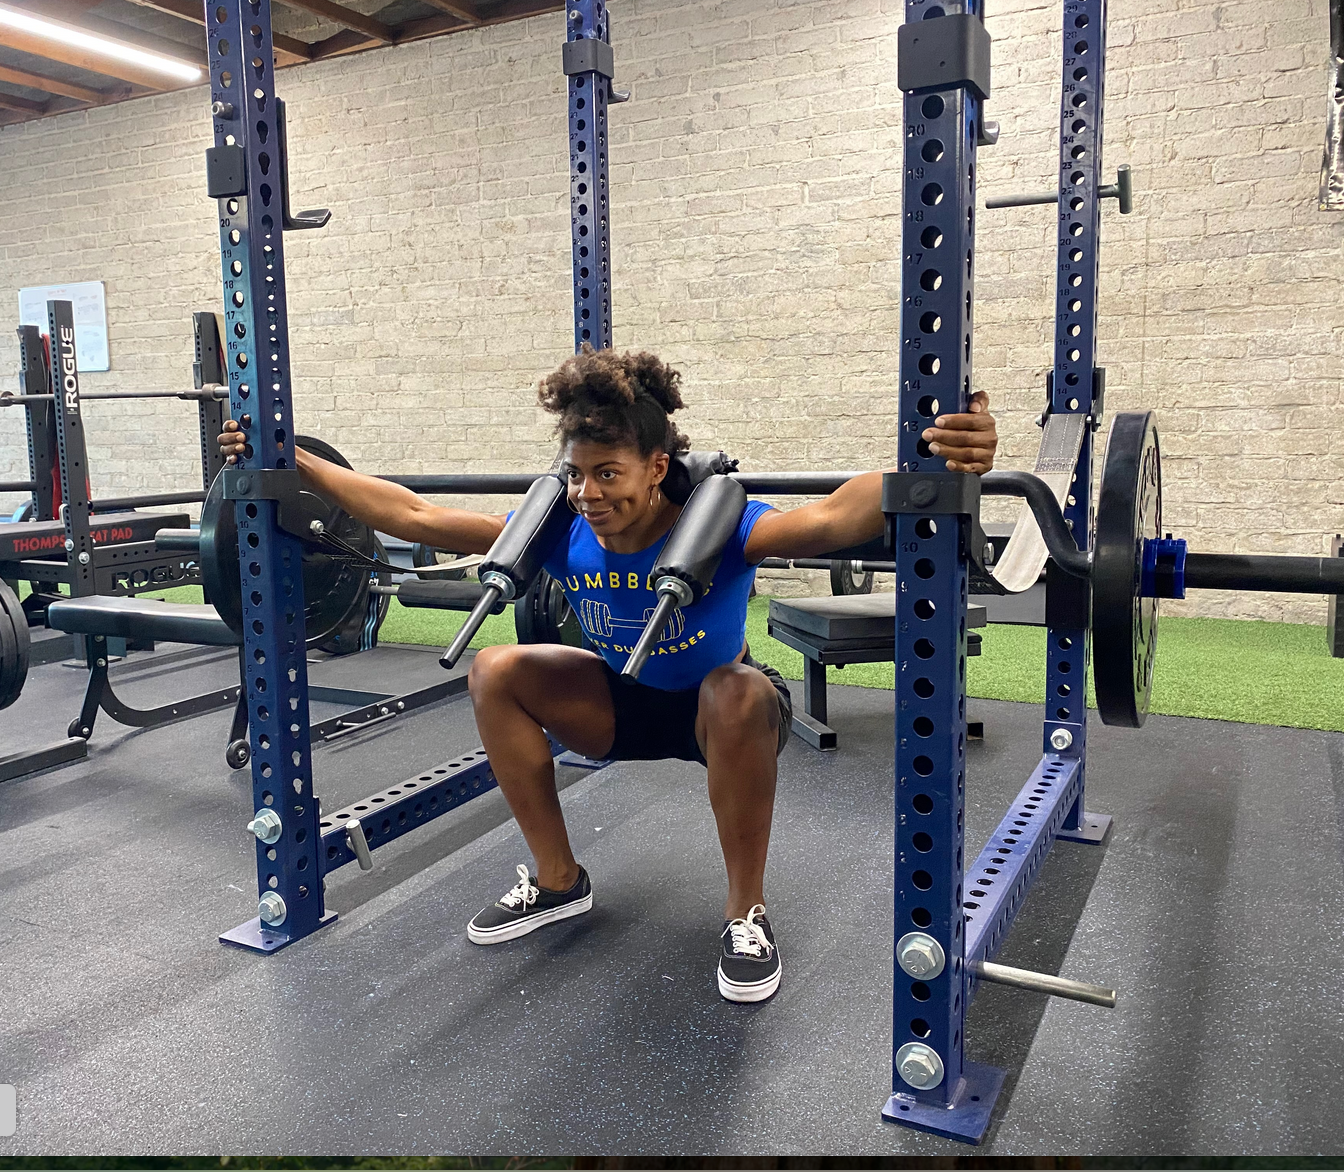
Photo courtesy of bretcontreras.com
The Hatfield Squat — also called the Self-Assisted Squat — is done with a Safety Squat Bar while holding onto the uprights of a power rack or a bar mounted to the rack. (We use band pegs as handles, which gives a secure grip for maximum pulling power. There is a video on our set up below in the “how to Hatfield squat” section.) As you stand back up from the bottom of the squat, you pull on the uprights to give yourself a boost. You use your arms more when the weight is heavy or when you hit a tough spot, and less when the movement feels easier. At the top of each rep, you let go of the tension completely, take your breaths, and go again.
The result? You can use more weight, squat deeper, and move with better form than you can in a standard back squat. Some people hear "using your arms" and think that sounds like cheating — but it isn't, and we'll get to why in a moment.
The Safety Squat Bar: Why It Matters
The Hatfield Squat is done with a Safety Squat Bar (SSB), and it's worth knowing why that bar is so useful on its own.

Photo courtesy of roguefitness.com
The SSB has a cambered, padded yoke design that lets you hold the bar at the front instead of gripping it behind your back. That simple change has some big benefits:
It's easier on your shoulders and wrists. No need to stretch your arms into an uncomfortable position with the barbell on your back. People with shoulder issues or limited mobility can squat pain-free.
It builds your quads and upper back. The bar's design pushes your weight slightly forward, which keeps your torso more upright and puts more work on your quads — the main muscles that drive you out of the bottom of a squat.
It cleans up your squat mechanics. The upright position the SSB puts you in makes it easier to hit good depth and stay balanced. A lot of lifters find their squat technique actually improves when they switch to the SSB.
It's a serious piece of equipment used in serious gyms, and when you pair it with the Hatfield technique, the results can be outstanding.
How to Perform the Hatfield Squat
You need a Safety Squat Bar, a power rack, and something solid to hold onto — band pegs through the power rack work great.
Setup:
Load the SSB and unrack it like a normal back squat.
Grip the handles at about waist to naval height.
Stand in your normal squat stance.
Here’s a video that shows how I set up -
The movement:
Squat down with an upright chest. The SSB helps you stay tall naturally.
At the bottom, push through your heels and start to stand. As you drive up, pull on the uprights to help yourself through the hard part.
Pull harder when you're grinding — ease off as you get closer to the top.
Breathe. Descend again.
The more you practice pacing your breath and releasing tension at the top, the more reps you'll be able to complete.
Why the Hatfield Squat Is Made for the 20-Rep Program
Here's something that doesn't get talked about enough: the traditional 20-rep breathing squat has a weak link, and it's not your legs.
When you do a standard barbell breathing squat, your upper back, shoulders, and grip are holding that bar the entire time — through every breath, every rest-pause, every grinding rep. On a brutal 3-4 minute set, your arms can go numb. Your upper body taps out long before your legs ever get close to failure. The thing that was supposed to be a leg-destroying protocol gets cut short by your grip or your traps giving up.
The Hatfield variation fixes that completely.
The upper-body bottleneck is gone. The yoke of the SSB sits securely on your neck and shoulders — you're not gripping or balancing anything. Your upper body stays “relaxed” the whole set. You can stand under a heavy bar and breathe for as long as you need to without your arms going numb or your upper back cramping up. The legs are now the true limiting factor, which is exactly the point.
You can force reps you'd have no business completing otherwise. When you hit rep 17 and you genuinely don't know if you have another one, you pull on those band pegs and spot yourself out of the hole. Your quads and glutes get pushed past the point where they'd normally shut things down. You are overloading the target muscles in a way a standard squat simply cannot do. If you're chasing hypertrophy, this is a big deal.
You can handle more weight. Most lifters can move 25% or more on a Hatfield squat than a standard back squat. On a program that's already built around heavy loading, that extra weight makes everything harder — in exactly the right way. More load, better mechanics, and a movement that keeps your legs in the fight for all 20 reps. That's the combination that makes the 20-rep Hatfield squat something special.
My Own Experience: A Personal Record Story
I started using the Hatfield Squat about three months ago, and the results surprised even me.
The very first day I tried it, I loaded the Safety Squat Bar to my current one-rep max — and hit 5 reps using the Hatfield squat. First time ever doing the movement. Not only was it strong, my form was actually better than in my normal squat. It felt good. No low back strain, no hip grinding, no fighting the bar. Just a clean, powerful squat.
Here is a comparison video that shows the SSB on the left and the Hatfield on the right. Same weight, 5 times as many reps, with cleaner technique.
By my third Hatfield workout, I matched my all-time best back squat: 440 pounds. A number I'd worked toward for years (and done many years ago), and I matched in a few weeks on a lift I had just learned.
Two months in, I hit 500lbs for 3 reps.
At that point I decided to test my true 10-rep max so I could set a weight for a 20-rep squat program. A real 20 rep squat program uses your honest 10-rep max — not a rest-pause 10 where you stop and breathe for 10 seconds between each rep, but 10 consecutive reps with no more than two or three breaths between each one.
Memorial Day 2026. I loaded 400 pounds and went. Ten reps with 3-4 breaths per rep at most — right at the upper edge of what I'd call consecutive. My 10-rep max was set.
The following week I went for 20.
I made it to 13 and hyperventilated. Two things went wrong: I kept my arms tense the entire set — including at lockout, where you don't need any tension at all, just wasted energy. I also went too fast early, burning through the first 10 reps like it was a speed test.
The week after I fixed both. I released my grip at the top of every rep and paced myself from rep one. The difference was obvious and I hit all 20 reps. It was a true max effort — but the bar got racked.
To be clear: a genuinely all-out 20-rep squat set ends when you can't come back up — not when you decide not to. In 30 years of lifting, I've only truly squatted to muscular failure a handful of times. It demands a level of focus and willpower that most people never reach. My 20-rep set was as close as I've come recently — but the door is still open to push even further.
The Mental Side: How to Get Through a 20 Rep Set
The hardest part of a 20-rep squat program isn't physical. It's mental. Your brain will try to stop you long before your body actually needs to. Here's how to fight back.
Break the set into chunks. Don't think about 20 reps. Think about getting to 5. Then think about getting to 10. Then tell yourself anyone can do 5 more. Then get the last 5 however you have to. Divide and conquer. Or you can think of it as a set of 10 plus 10 singles. This is my preferred method - I literally count to 10 twice.
Commit to your breathing ritual. The rest-pause breathing between reps is not optional — it's the whole point. Take 2-3 deep, slow breaths between each rep. More as you get deeper into the set. This isn't resting; it's fueling the next rep. Make the breathing automatic so you don't have to think about it.
Pick a focal point and lock in. Stare at a fixed spot on the wall in front of you. Don't look around. Don't think about the people in the gym. Narrow your entire world down to the bar and the next rep.
Say a number out loud (or in your head). Counting each rep out loud — even in a whisper — keeps your mind anchored and stops you from losing count when fatigue sets in. Some lifters prefer counting down from 20, so each rep feels like progress toward zero rather than a climb toward a big number.
Use a mantra. Simple phrases work better than complex thoughts under heavy fatigue. "One more." "Keep going." "Not done yet." Find something short that you believe, and repeat it every time your mind starts to argue with you.
Arousal level. Many elite lifters describe their best sets as happening in a state of controlled aggression. Getting fired up before and during a max set isn't unprofessional — it's strategic. Loud music, a training partner who pushes you, or just tapping into something that makes you want to fight — whatever works for you is fair game.
Know the difference between pain and failure. Your legs will burn. Your lungs will scream. That's not failure — that's the set working. True muscular failure means the muscle physically cannot contract anymore. Most people quit long before that point. Learning to stay in the pain without panicking is a skill, and it gets better the more you practice it.
What Other Lifters Have Done — and What You Can Aim For
One of the great things about the 20-rep squat program is that it comes with a built-in history of what's possible. Here are some real-world benchmarks to put your own training in context:
Tom Platz (Barbell Back Squat)
Stats: ~37 years old | ~230 lbs bodyweight | 525 lbs for 23 reps
The Feat: Performed during a legendary 1992 exhibition in Germany against powerlifter Fred Hatfield. Platz also famously squatted 350 lbs for 52 reps on a separate occasion.
Kirk Karwoski (Barbell Back Squat)
Stats: ~20s | ~275 lbs bodyweight | 585 lbs for 20 reps
The Feat: Known as "The Captain," Karwoski achieved this massive set raw (using only a belt and wraps) during his training prime.
Kevin Tolbert (Barbell Back Squat)
Stats: ~20s | ~230–240 lbs bodyweight | 500 lbs for 20 reps
The Feat: An elite multi-sport athlete out of Yale, Tolbert trained under the strict High-Intensity Training (HIT) guidance of Dr. Ken Leistner.
Dr. Ken Leistner (Barbell Back Squat)
Stats: 53 years old | ~160 lbs bodyweight | 407 lbs for 23 reps
The Feat: Filmed in his garage gym later in life, this set serves as the ultimate expression of his "look of power" training philosophy. Dr. Ken immediately followed this agonizing set of squats by strict overhead pressing 253 lbs for 4 reps.
Fred Hatfield (Hatfield Squat)
Stats: ~40s | ~245 lbs bodyweight | 400+ lbs for 20 reps
The Feat: As the inventor of the Safety Squat Bar, "Dr. Squat" routinely utilized high-rep, hand-assisted protocols during his off-season conditioning blocks before going on to set the all-time world record with a 1,014 lb squat.
What to expect in the program
Beginners running their first cycle often add 30-50 pounds to their squat in 6 weeks while also gaining noticeable muscle mass — especially in the legs, upper back, and chest from the heavy breathing work.
Advanced lifters use the 20-rep format as a shock protocol — running it for 4-6 weeks when progress has stalled, then returning to their normal training with a new ceiling on their strength. Advanced lifters and the hard living types have also built the wherewithal to push this program to 12 or more weeks as well.
Some targets to consider setting for yourself:
First goal: Complete a true set of 20 reps with your 10-rep max. Understand what 100% intensity of effort really is. After every set ask yourself, could I have done another rep if my life depended on it? Be honest about your effort.
Second goal: Add 10 pounds to the bar every time you get 20 or more reps. Yes, you should do more than 20 reps if you can!
Third goal: Stick with the program for at least 6-8 weeks. Give your best effort each and every workout. Remember that eating a lot and getting good sleep is part of the program.
The program works for almost everyone who actually commits to it. The reason most people don't see results isn't the program — it's quitting early, eating too little, or not pushing hard enough on the working set.
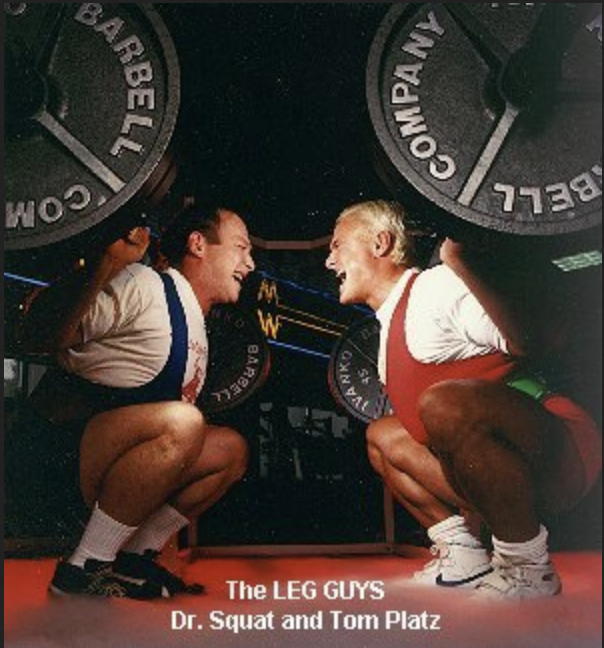
Photo courtesy of strengthfighter.com
Why the Hatfield Squat Might Be the Best Squat You Can Do
Here's the case in plain language: the Hatfield Squat is not a watered-down version of the back squat. For building total-body strength and muscle, it may actually be better.
At first glance you might think that using your arms to help with the lift is cheating. But that misses the point of what the squat is in the first place.
The back squat has always been a full-body exercise. Your legs push. Your core locks everything in place. Your upper back holds the bar. Your lungs power the whole thing. Every major system in your body is working. The Hatfield Squat doesn't take any of that away — it adds to it.
By pulling with your upper body as you stand, you bring your lats, biceps, shoulders, and upper back into the lift as active contributors — not just stabilizers. You are using more muscle to move more weight. It’s making a full body exercise into a fuller body exercise.
And the effect of moving heavier loads through a full range of motion reaches every inch of your body. Stronger bones, stronger joints, better hormone response, better conditioning — all of it goes up when the demands go up. A 400-pound Hatfield Squat for 20 reps challenges your entire body in a way that very few exercises can match.
The Hatfield Squat also fixes the most common problems that break down a regular back squat under heavy weight: forward lean, shoulder pain, lower back strain. With the SSB holding you upright and your hands giving you support through the sticking point, you can push harder and go deeper — without the technique breakdowns that limit so many lifters.
Combine that movement with the 20-rep squat protocol — one of the most proven mass-building programs in the history of the sport — and you have something truly powerful. Not a shortcut. Not a trick. A legitimate, hard-earned tool for building the kind of strength and size that carries over to everything you do.
The 20-rep Hatfield Squat will test your lungs, your legs, and your willingness to keep going when your brain is begging you to stop. But done right — with good pacing, good breathing, and the guts to really push — it just might be the best set of squats you ever do.
Baltimore Kettlebell Club is located in Perry Hall, Maryland. We train hard, we train smart, and we believe the best version of any exercise is the one that lets you train harder for longer. Come see what we're building.